Showing posts with label Pink By Design. Show all posts

Tuesday, January 10, 2012

Valentine Pop Up Card

Today's Card Day Tuesday over at My Cricut Craft Room.

The theme for today's cards is Pop Up or use the I-Top.

Here's mine-


I love how this card turned out! You can go here for the tutorial. I think this card is such a neat idea, because you could always put a pocket on the front or back of the tag for a gift card.


Here's what I started with- 4.25" x 11" piece of card stock for the base. 2.5" x 5" piece for tag(stripe) and 2.75"x 5.25" piece for tag matting(polka dot). 1.5" circle punch and a scallop punch.( I wanted the circle inside the scallop but I didn't have a punch that size so I just reversed it) 
I cut the nuts from Handy Man at 2.5"(I hid the screw the cuts out with them on my gypsy)
The bolts were cut from Robots Party at 3.30". I cut 4 all together but 2 of them I hid the slits on so I could use them as a background layer.


Here's the tag and the base before it is all put together. I used 2 colors of Trendy Twine for the tag and around the base. I inked the nuts and bolts with black ink and stamped a Pink By Design Sentiment on a punched circle. The black border on the tag is from an EK Success punch.
Make sure that you leave enough space at the bottom of the tag for it to be attached to the base. I had to move my nuts and bolts up a few times it get it right.


The flat closed view of the card. I used foam squares to add the nuts on the front. 
I used my Crop a Dile to add the eyelet on the top to put the twine through.


Here's a close up of the tag.

Recipe-

Cricut Cartridges- Handy Man and Robots Party

Paper- Core'dinations (black pearl, white)Paper Studio(U+Me)

Stamps- Pink By Design(Tool Time)

Twine- Trendy Twine(Cherry Cupcake, Berry Red)

Other- Memento black and red ink, EK Success border punch, foam dots, Crop a Dile , and Eyelet.

Make sure you stop over at My Cricut Craft Room to see more projects like mine!

Thanks so much for looking!


Sunday, January 8, 2012

Erica's Craft Room 100 Cricut Cartridge Blog Hop Day 2

Welcome to Erica's Craft Room 
100 Cricut Cartridge Blog Hop


You should have come from Sheila's blog, if not please go to the beginning and start at Erica's blog so you don't miss any of the other fabulous projects!


I made 2 different Easel cards for my projects today.


My first easel card was made with Ribbons and Rosettes and Live Simply. The rectangle that says "a little hello" is cut at 1.75"x 2.5" and the brown is cut at 2"x 2.75" and then I rounded the corners with a punch. The patterned rectangle is cut at 2.25"x 5.75".


Here are the rosettes I cut. I used my gypsy and welded 2 together two times at 2.75" <Stamp1> If you don't have a gypsy you would just need to cut 4 and glue together, this way I only had to glue 2 pieces, the only downfall of welding them is you lose the score lines.


Here's everything else I cut and used. The main card it 6"x12" folded in half and then one half folded again. The white part is where you glue a 6"x6" square of the same color, only the bottom half of that square will be glued. The stamped squares were cut at 2.75" <stamp1md> and the shadow for it.(Ribbons and Rosettes) The snail is from Live Simply cut at 1.75"

Close up of the snail. I used Peachy Keen Stamps for the face and some Studio G glitter glue on the swirl. I inked everything with Memento brown ink, and did some gel pen stitching all over the card.

Recipe-
Cricut Cartridges- Ribbons and Rosettes and Live Simply
Paper- DCWV(Green Tea Stack) and Core'dinations white
Stamps- Pink by Design(Go Green) Peachy Keen (PK-279 Faceless Bugs) Random stamp set from Big Lots
Other- White gel pen, black and brown Memento ink, Studio G glitter glue, ribbon

The second card is a Twisted easel card which is super simple too.


Sorry I didn't take pictures while I was making this one. (Oops)
There is a great tutorial here for one. 
So here's what I did-
  1.  I cut a 6" x 12" and 6"x 6" out of white, then 1 cut 2 -5.75" squares out of the coffee bean paper.
  2. I cut the background from Paper Lace at 5.5" <heart1> white is glitter paper  and red is pearl.
  3. I cut the shadow <Love-S> from Lacy Labels at 3" Real Dial size and then used my Sew Easy and twine for the hearts. I inked the edges with red distress ink. I also added a few stamped coffee beans.
  4. I cut <cofecup2> at 2.5" out of scraps and inked with brown ink and stamped the white part with a heart.
  5. I punched a 2" circle, inked it, stamped the sentiment on and used a foam dot for dimension, I used a Spellbinder die for the Happy Valentine's Day tag on the base and used foam dots to hold the card open. 
  6. Last I punched the heart border out of pearl paper and added the buttons with a little twine. I inked anything white with red ink and the brown paper with brown ink.
Recipe-
Cricut Cartridges- Love You A Latte, Paper Lace and Lacy Labels
Paper- Core' dinations(glitter, white) Recollections(red pearl)Coffee paper, Scraps
Stamps- Fiskars(Coffee Set) Studio G($1 stamp)
Twine- Trendy Twine(Cherry Cupcake)
Other- Sew Easy and Large Heart head, Copics, Tim Holtz Red Distress ink, Memento Brown ink, EK Success heart border punch, buttons

Thanks so much for stopping by!

Your next stop on the hop is Laurie

Here's the complete blog line up in case you get lost.

Erica's Cricut Craft Room- http://mycricutcraftroom.blogspot.com/
Jamie- http://jamiek711designs.blogspot.com/  (You are here)
Laurie- http://mincedpaper.blogspot.com/  (You're next stop)


Thursday, January 5, 2012

Theme Day Thursday- Baby Boy

I've got some more exciting news... I joined the My Cricut Craft Room Design Team!
Here's my first project for the team, today's theme is Baby Boy so I made this super cute  "spring" card.


You can find the tutorial here. All you need is a 5 1/4"x 10 1/2" piece of card stock to make the base, it's super easy. One thing that I did that's not in the tutorial is glue the bottom triangle to the base of the card, It seems to help with the "spring" of the card.


Here's a close up of the baby. I used my Gypsy and hid the cut lines on the face so I could use Peachy Keen Stamps. The Baby is cut from Baby Steps at 3.5" and I used the largest face stamp from the asst. The printed square is cut at 3.5" and the lower rectangle is cut at 2 5/8" x 5 1/8". The sentiment is from Pink by Design.
I also wrapped some Trendy Twine around the square and ink the edges with a lime green ink.


Here is a pic of the back of the card the triangle on the left side of the picture is the one that is glued to the bottom.

Recipe-

Cricut Cartridge- Baby Steps(bbyboy2) pg.42

Paper- Me and My Big Ideas(Animal Kingdom-yellow dot) K & Company(Itty Bitty)

Stamps- Peachy Keen(Just Baby Faces Asst.), Pink By Design( Baby Love)

Twine- Trendy Twine(Twisted Lime)

Other- Gel Pens, chalk, ink, tacky tape, foam dots

Thanks for looking!
 Make sure you stop by this weekend for the 100 Cartridge Blog Hop!


Now head over to My Cricut Craft Room to see more projects like mine!


Monday, January 2, 2012

Another Baby Girl Album

Here's another Baby Girl Album I made for my friend's sister. It's pretty similar to the first one I made, but I think it still turned out super cute.

Here's the cover-


The base of the album is cut from Art Philosophy at 5.5" The title is from Nursery Rhymes cut at 2". The flower is from my stash and I put a bow made out of Trendy Twine's Cherry Cupcake.


I used Baby Steps for all the babies cut at 2" except the sleeping baby is cut at 1.5" and Peachy Keen for their faces.


Most of the sentiment stamps are from Pink By Design.


I used Splish Splash from the Splish Splash Lite Cart cut at 1". The stamp with the sleeping baby is from a Fiskars baby set.


Inside flap from sleeping page.


Storytime was welded with the Nursery Rhyme font and I made tags for a few pages to write little notes on.


The onesie stamp is from The Greeting Farm.

Recipe-

Cricut Cartridges- Art Philosophy, Baby Steps, Nursery Rhymes and Splish Splash

Paper- K and Company (Itty Bitty), Recollections( Glitter Paper) Core'dinations(Gemstones)

Stamps- Pink By Design(My Type, So Big, and Baby Love) Fiskars( Precious Baby Quotes) Peachy Keen(Just Baby Faces Asst. and Just Baby Faces 1 1/8") The Greeting Farm(Build a Onesie Girl)

Twine- Trendy Twine(Cherry Cupcake), The Twinery(Lemondrop)

Other- Cereal boxes, Cinch Binder, Tim Holtz Ink, Memento Ink, gel pens, Stickles, Chalk, Copics, ribbon, scallop circle punch, square scallop punch and ABC punch.

Thanks for looking!

Don't forget about my giveaway! You have until Jan. 4th to enter here.


Monday, December 19, 2011

TGF 3rd Annual Customer Blog Hop

If your looking for Erica's Craft Room's 25 Days of Christmas page down or click here.


Welcome to the TGF Blog Hop, you can click the picture above to return to TGF for the list of blogs to visit.  TGF will be giving away a total of 3 Grand Prizes!  Two of them will go to participants in the blog and the third will go to a random hopper. The Grand Prize is the Entire upcoming January Release! The only way to win is to participate so make sure you hop along to every one's blog, here is the link again to find the list.

I'm participating in both project contests. 
Here's my holiday project-


I used the Xmas sweetie set and Holiday Anya for my tags.

Here's my General project


I made my friend card with Beanie Anya

Recipe- 

Cricut Cartridge- Art Philosophy(tags)

Paper- DCWV, Recollections, white card stock

Stamps- The Greeting Farm(Xmas Sweetie, Holiday Anya, Beanie Anya), Pink By Design(Friends To The 
End, Winter Fun)

Twine- Twinery(Caribbean), Trendy Twine( Peppermint, Candy Cane)

Other- Copics, Puffy Velvet Markers, Stickles, Epiphany Shape Tool, Spellbinders, Memento Ink

Don't forget to visit all the other blogs for you chance to win the Grand Prize.

Thanks for looking!


Hot Cocoa Gift Card Holder


Welcome to Erica's Craft Room
25 Days of Christmas,
with 25 Cricut projects a day.
Don't forget to stop by Erica's blog to see 24 more projects today....
and every day in December.

Today's theme is Hot Cocoa/Coffee/Tea. Here is the Gift Card Holder I made.


I used Love You A Latte for the cup of cocoa(at 3.5").  I used a Puffy Velvet marker for the whipped cream to make it look more real and red and green Stickles for the sprinkles.


The card was cut from Cindy Loo at 6.5" height.

Recipe- 

Cricut Cartridges- Cindy Loo and Love You A Latte

Paper- DCWV(plaid and green pattern), Paper Studio(green glitter, textured brown), Recollections(gold)

Stamps- Pink By Design(Winter Fun, Old Time Christmas)

Other- Momento Dye Ink(red,black,brown), ribbon(target $1 bin), Scallop punch, Stickles(red and green)

Thanks for looking! 


Friday, December 16, 2011

Christmas Treat Holders


Welcome to Erica's Craft Room
25 Days of Christmas,
with 25 Cricut projects a day.
Don't forget to stop by Erica's blog to see 24 more projects today....
and every day in December.

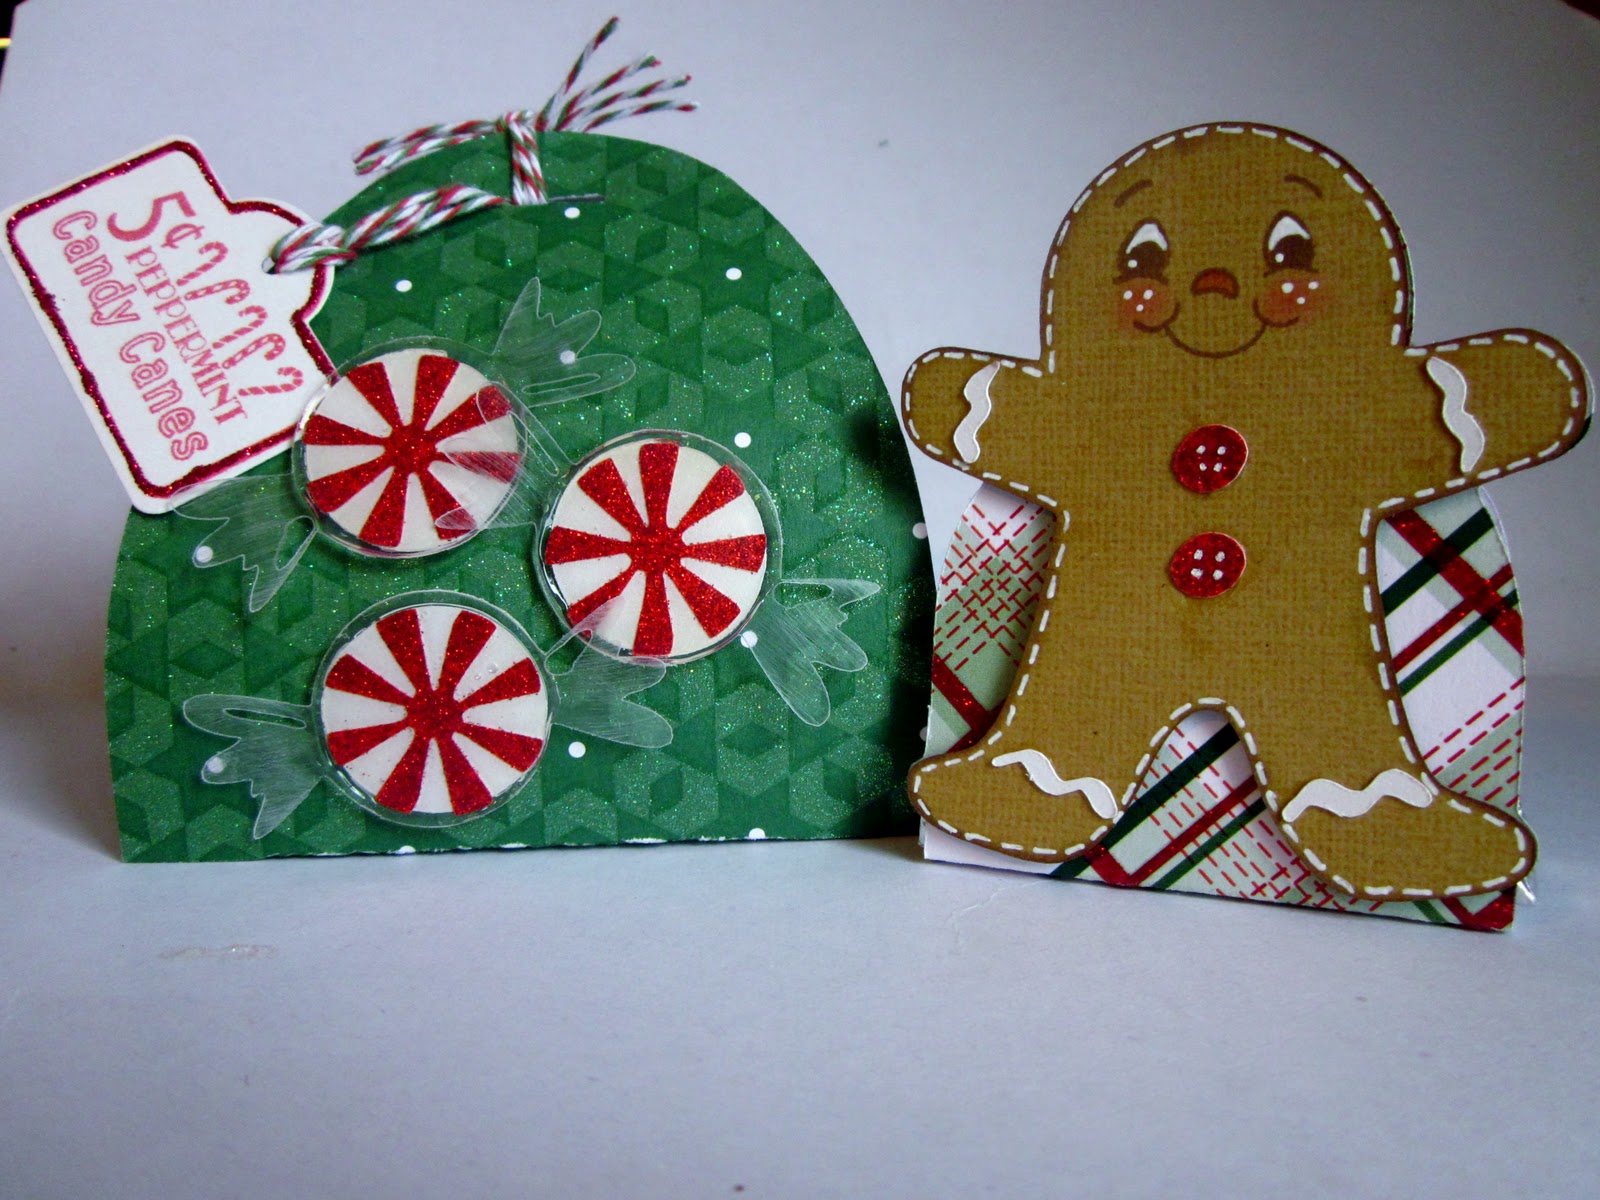
Today's theme is Candy. Here are my two projects.


A candy cane box and a Hershey Nugget holder.


Here what the box looks like opened. The candy is cut from Sweet Shop at 1.25" and the box is from Art Philosophy cut at 11.5".


I wrapped mini candy canes in silver tulle and tied it closed with some twine.


And here's the finished product. I used the plastic that my cartridges came it for the candy wrapper and sanded it, then glued the candy piece to the plastic with glossy accents. The tag is made with Goodie Labels from Pink By Design.


For my second treat holder I used my Gypsy and welded a rectangle(2.5"x5") to the gingerbread man(3.25") to make this shape above. I then scored it at 2" and 3 3/8". If you don't have a gypsy you could always just glue the gingerbread man to the front.


Here's my little man before the gel pen stitching and rosy cheeks. I used a face from Peachy Keen  Snowmany Faces asst.


I used the Pink by Design stamp and die set It's a Wrap to cover the chocolate nuggets.


And here's the finished holder, I attached him with 3d foam dots so he sticks out a little.


Here you can see how the candy fits in there. You can fit 2 candy bars into this. I used a 3m glue dot that is re-potion-able to close it, but I think I might change it to a regular glue dot because it keeps popping open.


Here they are done again.

Recipe Green Box-

Cricut Cartridges- Art Philosophy and Sweet Shop

Paper- DCWV(Mrs. Claus's Kitchen) Paper Studio( glitter paper), and Core'dinations(white pearl) Clear Plastic

Stamps- Pink By Design(Goodie Labels)

Twine- Trendy Twine(Christmas Candy Cane)

Other- Red Stickles, Memento Ladybug Ink, Glossy Accents, Silver Tulle

Recipe Gingerbread Treat Holder-

Cricut Cartridges- Jolly Holidays and Gypsy Wanderings

Paper- DCWV(Mrs. Claus's Kitchen), Paper Studio(glitter paper), Core'dinations(opal pearl, burnt sugar)

Stamps- Pink By Design(It's a Wrap stamp and die set) Peachy Keen(Snowmany Faces asst.)

Other- Memento ladybug and Rich Cocoa ink, white gel pen, chalk, 3d foam dots

Thanks for looking!


Monday, December 12, 2011

Snowman Christmas Card


Welcome to Erica's Craft Room
25 Days of Christmas,
with 25 Cricut projects a day.
Don't forget to stop by Erica's blog to see 24 more projects today....
and every day in December.

I made a card with embossing powder for today's theme of Snow.


I embossed the snowflakes from the Pink By Design Falling Snow Background stamp with silver powder for the front of my card. I'm not the greatest with embossing powder but I think it turned out ok. And can you believe I used 4 different Carts for this card! I listed them all below.


I made the inside pretty simple with twine and a snowflake from Winter Lace. The 2 plaid pieces of paper are cut at 4.25" x 5.25".

Recipe-

Cricut Cartridges- Lacy Labels(Asian cut at 11"H x 5.5" W real dial size) Ribbons and Rosettes(tree border 1x6 both layers) Winter Frolic(Snowman2-3") Winter Lace(2.5" for both snowflakes-row4 button 5 and row2 button 2 from the left)

Stamps- Pink By Design(Falling Snow Background Stamp and Snowflakes(2 sentiments)
Peachy Keen- PK- 544 Snow Small Faces

Paper- K&Company Christmas paper stack(plaid inside card and on snowman and trees) Core'dination(pearl for snowman and snowflakes) Paper for card base was from my stash

Other- Silver embossing powder, twine(etsy), Memento black ink, blue chalk ink, Copics and chalk.

Thanks for looking!


Sunday, December 11, 2011

Hot Cocoa Gift Buckets

I made these cute hot cocoa gift buckets out of clear buckets from the dollar section at Target.


I filled them with 2 packets of hot cocoa and a small bag of marshmallows.

Recipe-

Cricut Cartridges- Jolly Holidays(Elf 3.5" Presents 1.5") Winter Frolic(Snowman 3.5")

Stamps- Peachy Keen(PK-480 Christmas Character Face Asst.) Pink By Design(Goodie Labels and Die)

Twine- Timeless Twine(red/green)

Paper- Core'dinations(white gemstone), DCWV(green-Christmas Stack) Scraps

Other- Memento Black ink, Stickles, white gel pen, Copic markers, chalk, xyron sticker maker, clear buckets

Thanks for looking.

I'm getting close to 100 followers! Yeah! I'll be doing a giveaway once I get there.


Friday, December 9, 2011

Christmas Tags


Welcome to Erica's Craft Room
25 Days of Christmas,
with 25 Cricut projects a day.
Don't forget to stop by Erica's blog to see 24 more projects today....
and every day in December.

Today's theme is Animals and here's my project I made with Peachy Keen Stamps.


The front of my 2 tags.


The inside.

Recipe-

Cricut Cartridges- Art Philosophy(tags 4") Create A Critter(Skunk 2.5" and Reindeer 3") Pooh and Friends(Hat .88")

Paper- Recollections (tags-Warm Wishes)Scrap paper(reindeer and skunk)

Stamps- Peachy Keen (Reindeer PK-493 Everyday Character Face Parts) (Skunk-PK-757 Wide Eyed and Bushy Tailed) Pink By Design (To/From-Christmas Wishes)(Merry Christmas- It's a Wrap)

Other- Twine(The Twinery), Stickles, Epiphany Shape Tool, Memento Ink, White Gel Pen, Red Chalk, ribbon, Dress it Up embellishment(snowflake)

Thanks for looking!


Thursday, December 8, 2011

Christmas Matchbox Advent Calendar


Welcome to Erica's Craft Room
25 Days of Christmas,
with 25 Cricut projects a day.
Don't forget to stop by Erica's blog to see 24 more projects today....
and every day in December.

Today's theme is Calendars so I made an Advent Calendar.

This is how it started...


I cut out all of my matchboxes from a gypsy file made with Gypsy Wanderings. ( I got the file from a fantastic lady off the Cricut message board "cricaholic" ) But you could use any kind of matchbox, I know that Stampin Up has a die by Sizzix and Tags, Bags, Boxes and More has one too. You could even you regular ones and paint them or cover with paper. You will need 24 of them.


Next I stack 3 of the matchboxes and glue together. Then I inked all the edges, because you won't see most of the box when it's done. Do this with all 24 boxes.


Then I cut a piece of card stock to fit one side of the stacked boxes. I don't remember the size but it will be different depending what size your matchboxes are anyways. I choose to use a different pattern for each box stack. I inked the paper edges with red or green distress ink.


Once all paper is glued to the side of each stack(I used red tacky tape), you set the boxes up like shown above and glue together. I just glued the top layer to the bottom layer as it's very difficult to glue the boxes on the same layer together. Once the bases are added they stay together just fine.


I used Art Philosophy to cut out 2 bases in chipboard(cereal boxes) and 4 bases in the card stock, just remember to either flip the image you are cutting or flip the paper for to of the card stock bases otherwise they will no match up perfectly on one side of the base. (hope that makes sense)


I cut out red and green rectangles to fit the front of the matchboxes and inked all the edges. I then stamped and embossed the numbers on each rectangle with Pink By Design So Big set. I used white brads for the handle which I put all the way through the front of the drawer. So I glued on the rectangle and then inserted the brads. Next I put some green ribbon up the center of each side.


Here I put the bases on. I used hot glue, but I would recommend a different kind of glue since hot glue dries so fast and it's hard to adjust once it's down.


Last I made a bow for the top. 
Here are few more pictures of the finished project.


Recipe-
Cricut Cartridges- Gypsy Wanderings, Art Philosophy

Stamps- Pink By Design (So Big)

Paper- DCWV (The Merry Christmas Stack)base+bow(Mrs. Claus's Kitchen Stack) Core'dinations (white)

Others- Red and Green Pigment ink, Tim Holtz winter distress ink set, clear embossing powder, white brads, red tacky tape, green ribbon, and hot glue

I filled it with different chocolates and gave it to my Grandma for her birthday.  


Sorry for such a long post.  Feel free to email me with any questions about my project.

Hope you enjoy!