Showing posts with label Ribbons and Rosettes. Show all posts

Sunday, January 8, 2012

Erica's Craft Room 100 Cricut Cartridge Blog Hop Day 2

Welcome to Erica's Craft Room 
100 Cricut Cartridge Blog Hop


You should have come from Sheila's blog, if not please go to the beginning and start at Erica's blog so you don't miss any of the other fabulous projects!


I made 2 different Easel cards for my projects today.


My first easel card was made with Ribbons and Rosettes and Live Simply. The rectangle that says "a little hello" is cut at 1.75"x 2.5" and the brown is cut at 2"x 2.75" and then I rounded the corners with a punch. The patterned rectangle is cut at 2.25"x 5.75".


Here are the rosettes I cut. I used my gypsy and welded 2 together two times at 2.75" <Stamp1> If you don't have a gypsy you would just need to cut 4 and glue together, this way I only had to glue 2 pieces, the only downfall of welding them is you lose the score lines.


Here's everything else I cut and used. The main card it 6"x12" folded in half and then one half folded again. The white part is where you glue a 6"x6" square of the same color, only the bottom half of that square will be glued. The stamped squares were cut at 2.75" <stamp1md> and the shadow for it.(Ribbons and Rosettes) The snail is from Live Simply cut at 1.75"

Close up of the snail. I used Peachy Keen Stamps for the face and some Studio G glitter glue on the swirl. I inked everything with Memento brown ink, and did some gel pen stitching all over the card.

Recipe-
Cricut Cartridges- Ribbons and Rosettes and Live Simply
Paper- DCWV(Green Tea Stack) and Core'dinations white
Stamps- Pink by Design(Go Green) Peachy Keen (PK-279 Faceless Bugs) Random stamp set from Big Lots
Other- White gel pen, black and brown Memento ink, Studio G glitter glue, ribbon

The second card is a Twisted easel card which is super simple too.


Sorry I didn't take pictures while I was making this one. (Oops)
There is a great tutorial here for one. 
So here's what I did-
  1.  I cut a 6" x 12" and 6"x 6" out of white, then 1 cut 2 -5.75" squares out of the coffee bean paper.
  2. I cut the background from Paper Lace at 5.5" <heart1> white is glitter paper  and red is pearl.
  3. I cut the shadow <Love-S> from Lacy Labels at 3" Real Dial size and then used my Sew Easy and twine for the hearts. I inked the edges with red distress ink. I also added a few stamped coffee beans.
  4. I cut <cofecup2> at 2.5" out of scraps and inked with brown ink and stamped the white part with a heart.
  5. I punched a 2" circle, inked it, stamped the sentiment on and used a foam dot for dimension, I used a Spellbinder die for the Happy Valentine's Day tag on the base and used foam dots to hold the card open. 
  6. Last I punched the heart border out of pearl paper and added the buttons with a little twine. I inked anything white with red ink and the brown paper with brown ink.
Recipe-
Cricut Cartridges- Love You A Latte, Paper Lace and Lacy Labels
Paper- Core' dinations(glitter, white) Recollections(red pearl)Coffee paper, Scraps
Stamps- Fiskars(Coffee Set) Studio G($1 stamp)
Twine- Trendy Twine(Cherry Cupcake)
Other- Sew Easy and Large Heart head, Copics, Tim Holtz Red Distress ink, Memento Brown ink, EK Success heart border punch, buttons

Thanks so much for stopping by!

Your next stop on the hop is Laurie

Here's the complete blog line up in case you get lost.

Erica's Cricut Craft Room- http://mycricutcraftroom.blogspot.com/
Jamie- http://jamiek711designs.blogspot.com/  (You are here)
Laurie- http://mincedpaper.blogspot.com/  (You're next stop)


Thursday, December 15, 2011

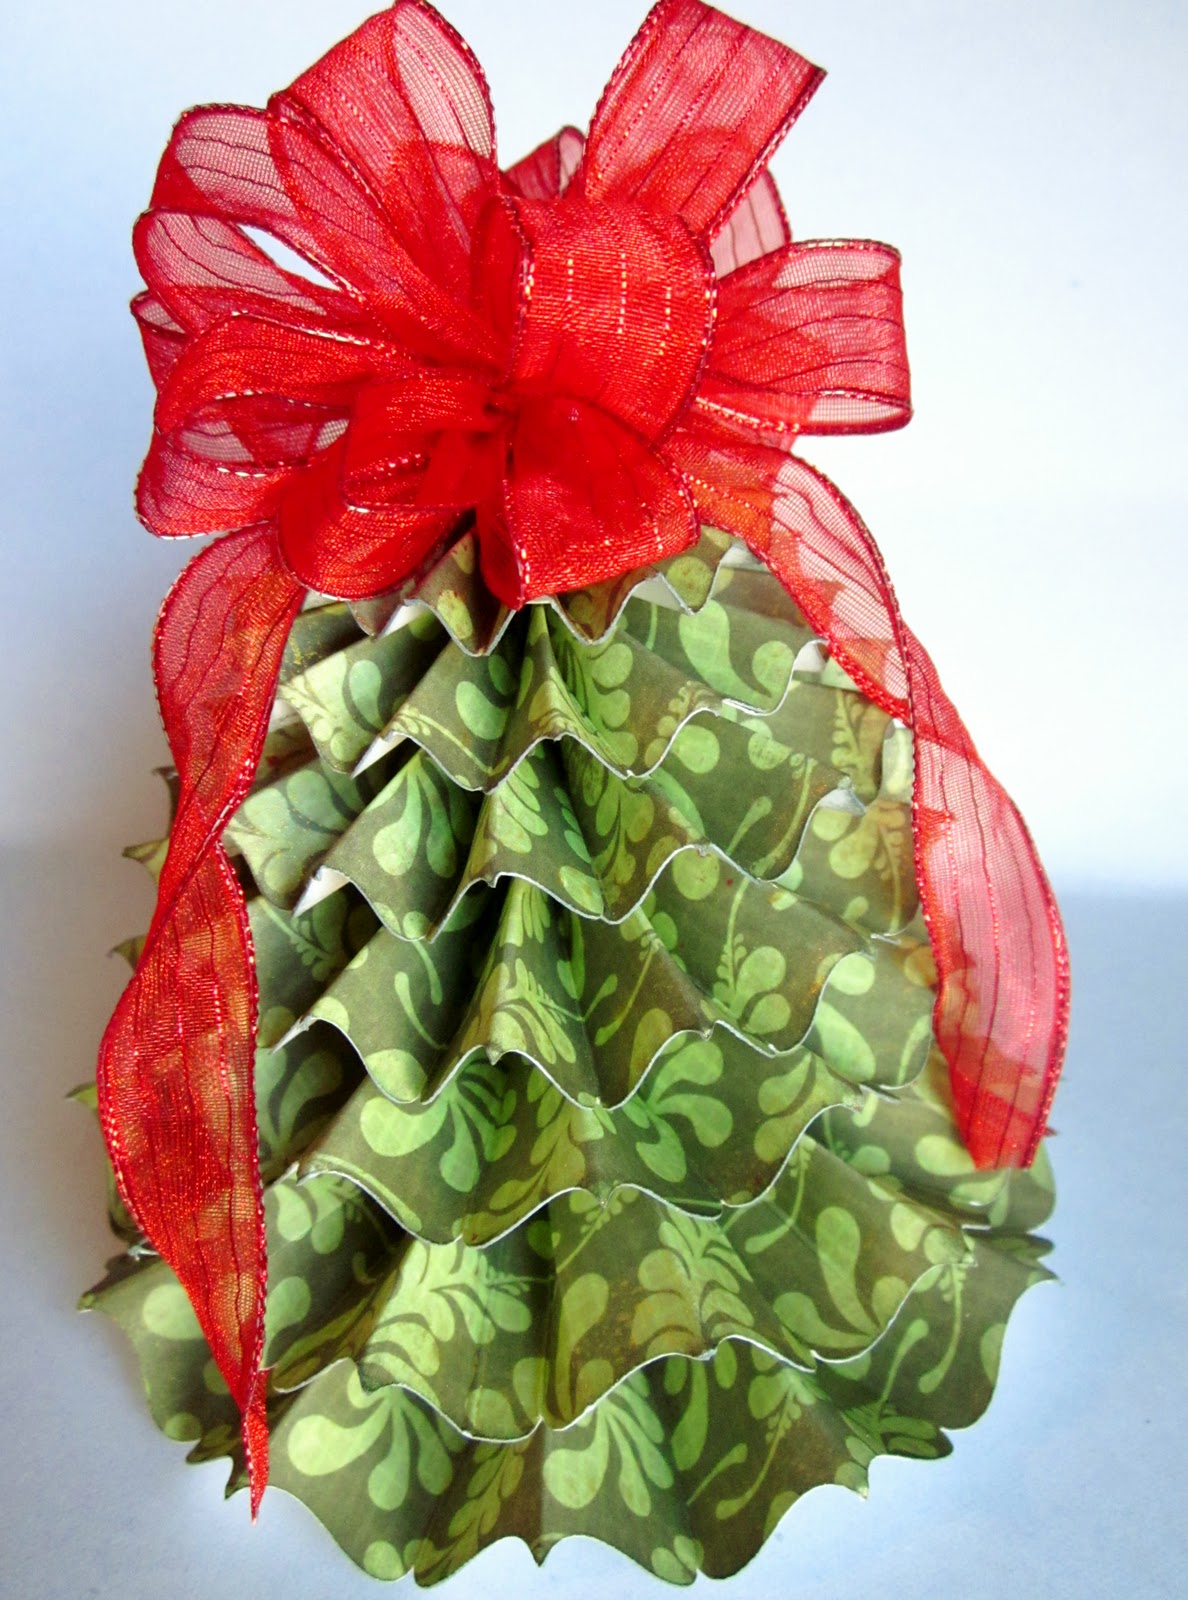
Rosette Christmas Trees


Welcome to Erica's Craft Room
25 Days of Christmas,
with 25 Cricut projects a day.
Don't forget to stop by Erica's blog to see 24 more projects today....
and every day in December.

The theme today was trees, here is what I made.


I used Ribbons and Rosettes to make this tree. It was my first time making a rosette with this cartridge. I used my gypsy to weld the pieces together so I didn't have to glue them all.


This is what they look like unwelded, depending on the size you will probably need 3-4 of these for 1 rosette.
I used the Bracket1 cut on page 26.


These are the ones that I welded, so much easier. I will list all the sizes and how many I welded together in the recipe below.


If you weld them together the score marks disappear which was fine with me, I just used my MS scoreboard to score them. You just score along each peak and dip on the strip. Then you accordion fold them and glue them in a circle. Even for the ones I welded I still had to glue more then one strip together, except for the really small sizes. I used red tacky tape to glue together.


Then you punch out 1" circles and hot glue to the back of the rosette after you flatten it.


Hot glue each layer together by putting the glue in the center of the rosette. I spray mine with some gold shimmer spray after it was put together.


Then I made a bow with some wired ribbon and hot glued it to the top. I used glue dots on the ends of the long ribbon pieces so they would stay against the tree.


Here's the finished product again. I was going to leave it plan but then found these sparkly pompoms and thought they would be cute on the tree I stuck them on with glue dots.

Recipe

Cricut Cartridge- Ribbons and Rosettes (p.26 Bracket1) 
Sizes- 2.5",2.25" and 2" weld 4 together 2 times(so 2 strips)or 8 single
1.75" weld 3 together and weld 2 together or 5 single
1.5" and 1.25" weld 4 together and 1 single, or 5 single 
1" weld 5 together or 5 single.

Paper- Recollections ( O Christmas Tree Stack) White card stock or any scrap for the 1" circles

Other- Pssst! Sheer Shimmer Spray Gold, Red Ribbon, white and red sparkly pompoms, hot glue, glue dots

Feel free to message me with any questions or ask me questions on my Facebook page there's a link to it on the right.

Thanks for looking!


Monday, December 12, 2011

Snowman Christmas Card


Welcome to Erica's Craft Room
25 Days of Christmas,
with 25 Cricut projects a day.
Don't forget to stop by Erica's blog to see 24 more projects today....
and every day in December.

I made a card with embossing powder for today's theme of Snow.


I embossed the snowflakes from the Pink By Design Falling Snow Background stamp with silver powder for the front of my card. I'm not the greatest with embossing powder but I think it turned out ok. And can you believe I used 4 different Carts for this card! I listed them all below.


I made the inside pretty simple with twine and a snowflake from Winter Lace. The 2 plaid pieces of paper are cut at 4.25" x 5.25".

Recipe-

Cricut Cartridges- Lacy Labels(Asian cut at 11"H x 5.5" W real dial size) Ribbons and Rosettes(tree border 1x6 both layers) Winter Frolic(Snowman2-3") Winter Lace(2.5" for both snowflakes-row4 button 5 and row2 button 2 from the left)

Stamps- Pink By Design(Falling Snow Background Stamp and Snowflakes(2 sentiments)
Peachy Keen- PK- 544 Snow Small Faces

Paper- K&Company Christmas paper stack(plaid inside card and on snowman and trees) Core'dination(pearl for snowman and snowflakes) Paper for card base was from my stash

Other- Silver embossing powder, twine(etsy), Memento black ink, blue chalk ink, Copics and chalk.

Thanks for looking!