Showing posts with label Gypsy Wandering. Show all posts

Friday, December 23, 2011

Snowman Soup


Welcome to Erica's Craft Room
25 Days of Christmas,
with 25 Cricut projects a day.
Don't forget to stop by Erica's blog to see 24 more projects today....
and every day in December.


Today's theme is Snowmen. This is my last post as a seasonal design team member and I just wanted to say how much I've enjoyed creating all month long for this team. Now onto my project.


I cut the snowman from Gypsy Wanderings at 3" and the coffee cup is also cut at 3". I cut the steam off of the cup and cut the bottom of the snowman off. The silver behind the snowman was cut with a Spellbinder's die and it's sticker paper(which I had no idea it was until after I cut it, lol).


The stamp is from Jaded Blossom's set Snowman Kisses. I cut the label from Elegant Edges(2.5" and 2.75"), and the twine is Trendy Twine's Holly Berry.


I filled the bucket with Hot Cocoa, Marshmallows and Candy Canes.

Recipe-

Cricut Cartridges- Gypsy Wanderings, Elegant Edges and Love You A Latte

Paper- DCWV, Core'dinations, Paper Studio and white card stock.

Stamps- Peachy Keen (Snowmany Faces Asst.), Jaded Blossom (Snowman Kisses)

Twine- Trendy Twine(Holly Berry)

Other- Gel Pens, Chalk, Memento Black and green ink, Tim Holtz holiday distress inks

Thanks for looking!


Friday, December 16, 2011

Christmas Treat Holders


Welcome to Erica's Craft Room
25 Days of Christmas,
with 25 Cricut projects a day.
Don't forget to stop by Erica's blog to see 24 more projects today....
and every day in December.

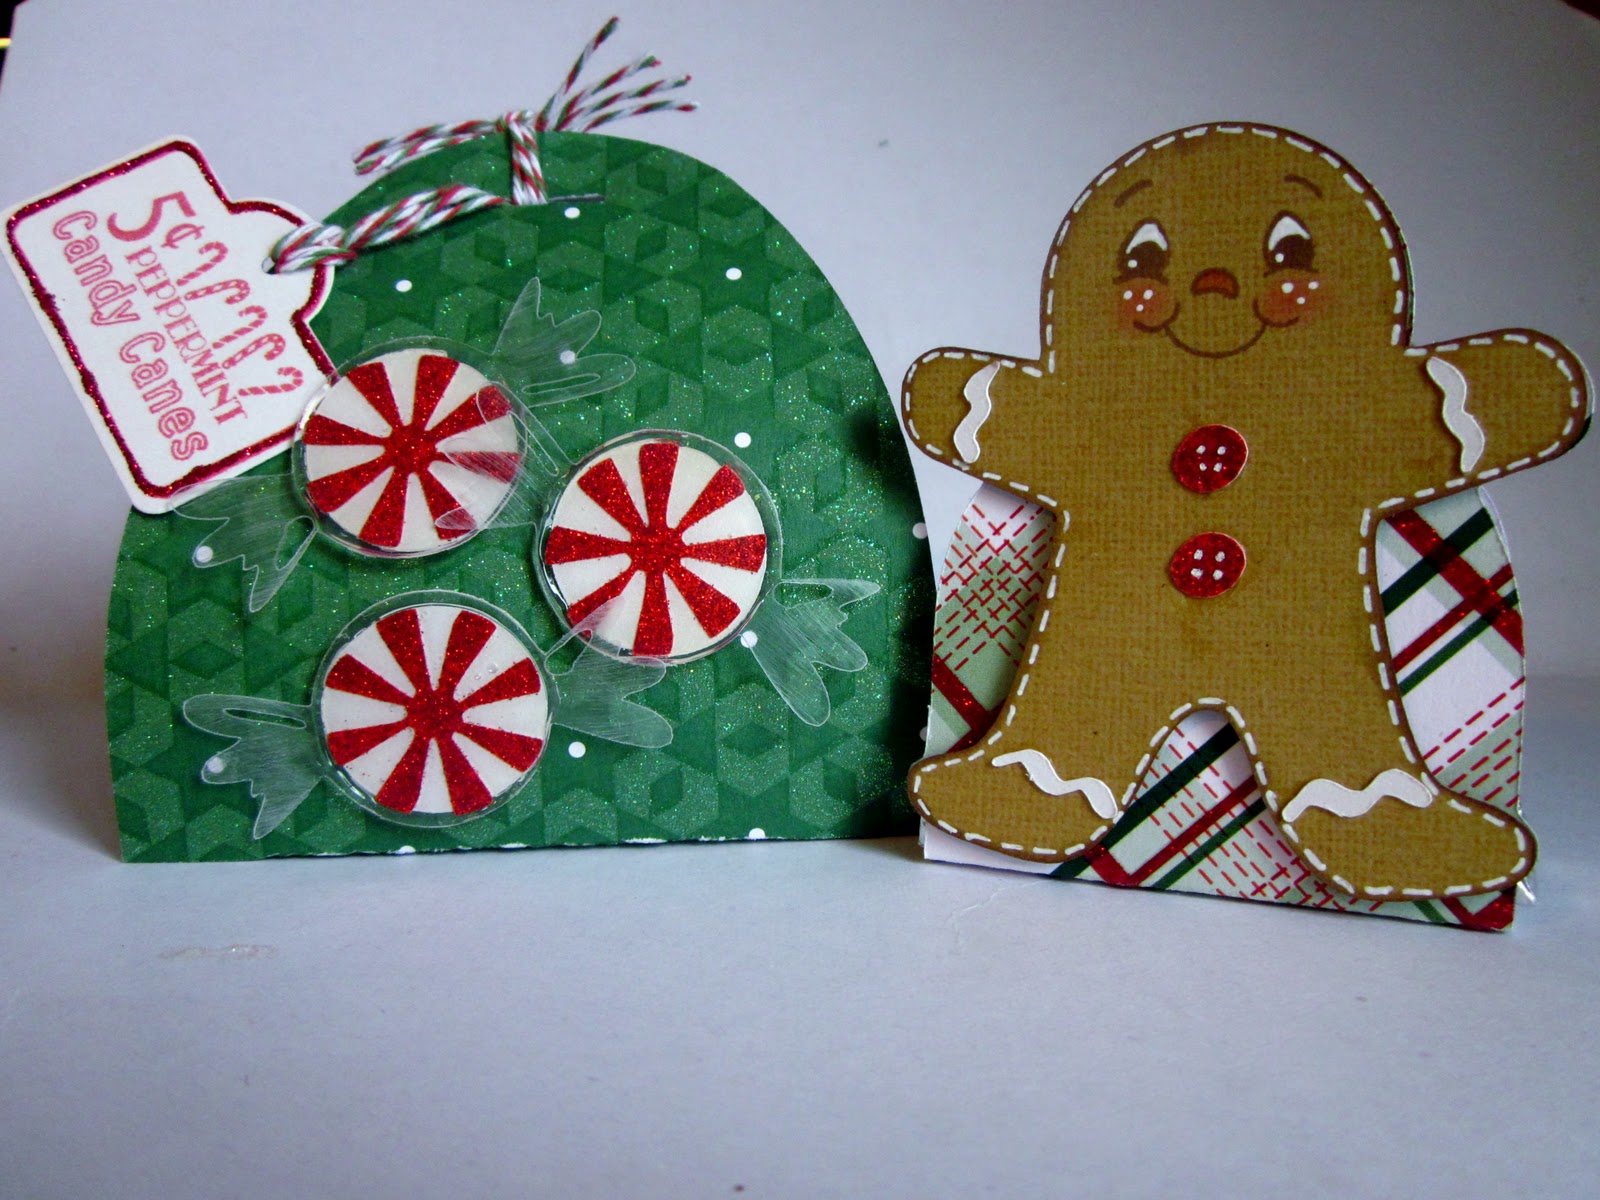
Today's theme is Candy. Here are my two projects.


A candy cane box and a Hershey Nugget holder.


Here what the box looks like opened. The candy is cut from Sweet Shop at 1.25" and the box is from Art Philosophy cut at 11.5".


I wrapped mini candy canes in silver tulle and tied it closed with some twine.


And here's the finished product. I used the plastic that my cartridges came it for the candy wrapper and sanded it, then glued the candy piece to the plastic with glossy accents. The tag is made with Goodie Labels from Pink By Design.


For my second treat holder I used my Gypsy and welded a rectangle(2.5"x5") to the gingerbread man(3.25") to make this shape above. I then scored it at 2" and 3 3/8". If you don't have a gypsy you could always just glue the gingerbread man to the front.


Here's my little man before the gel pen stitching and rosy cheeks. I used a face from Peachy Keen  Snowmany Faces asst.


I used the Pink by Design stamp and die set It's a Wrap to cover the chocolate nuggets.


And here's the finished holder, I attached him with 3d foam dots so he sticks out a little.


Here you can see how the candy fits in there. You can fit 2 candy bars into this. I used a 3m glue dot that is re-potion-able to close it, but I think I might change it to a regular glue dot because it keeps popping open.


Here they are done again.

Recipe Green Box-

Cricut Cartridges- Art Philosophy and Sweet Shop

Paper- DCWV(Mrs. Claus's Kitchen) Paper Studio( glitter paper), and Core'dinations(white pearl) Clear Plastic

Stamps- Pink By Design(Goodie Labels)

Twine- Trendy Twine(Christmas Candy Cane)

Other- Red Stickles, Memento Ladybug Ink, Glossy Accents, Silver Tulle

Recipe Gingerbread Treat Holder-

Cricut Cartridges- Jolly Holidays and Gypsy Wanderings

Paper- DCWV(Mrs. Claus's Kitchen), Paper Studio(glitter paper), Core'dinations(opal pearl, burnt sugar)

Stamps- Pink By Design(It's a Wrap stamp and die set) Peachy Keen(Snowmany Faces asst.)

Other- Memento ladybug and Rich Cocoa ink, white gel pen, chalk, 3d foam dots

Thanks for looking!


Thursday, December 8, 2011

Christmas Matchbox Advent Calendar


Welcome to Erica's Craft Room
25 Days of Christmas,
with 25 Cricut projects a day.
Don't forget to stop by Erica's blog to see 24 more projects today....
and every day in December.

Today's theme is Calendars so I made an Advent Calendar.

This is how it started...


I cut out all of my matchboxes from a gypsy file made with Gypsy Wanderings. ( I got the file from a fantastic lady off the Cricut message board "cricaholic" ) But you could use any kind of matchbox, I know that Stampin Up has a die by Sizzix and Tags, Bags, Boxes and More has one too. You could even you regular ones and paint them or cover with paper. You will need 24 of them.


Next I stack 3 of the matchboxes and glue together. Then I inked all the edges, because you won't see most of the box when it's done. Do this with all 24 boxes.


Then I cut a piece of card stock to fit one side of the stacked boxes. I don't remember the size but it will be different depending what size your matchboxes are anyways. I choose to use a different pattern for each box stack. I inked the paper edges with red or green distress ink.


Once all paper is glued to the side of each stack(I used red tacky tape), you set the boxes up like shown above and glue together. I just glued the top layer to the bottom layer as it's very difficult to glue the boxes on the same layer together. Once the bases are added they stay together just fine.


I used Art Philosophy to cut out 2 bases in chipboard(cereal boxes) and 4 bases in the card stock, just remember to either flip the image you are cutting or flip the paper for to of the card stock bases otherwise they will no match up perfectly on one side of the base. (hope that makes sense)


I cut out red and green rectangles to fit the front of the matchboxes and inked all the edges. I then stamped and embossed the numbers on each rectangle with Pink By Design So Big set. I used white brads for the handle which I put all the way through the front of the drawer. So I glued on the rectangle and then inserted the brads. Next I put some green ribbon up the center of each side.


Here I put the bases on. I used hot glue, but I would recommend a different kind of glue since hot glue dries so fast and it's hard to adjust once it's down.


Last I made a bow for the top. 
Here are few more pictures of the finished project.


Recipe-
Cricut Cartridges- Gypsy Wanderings, Art Philosophy

Stamps- Pink By Design (So Big)

Paper- DCWV (The Merry Christmas Stack)base+bow(Mrs. Claus's Kitchen Stack) Core'dinations (white)

Others- Red and Green Pigment ink, Tim Holtz winter distress ink set, clear embossing powder, white brads, red tacky tape, green ribbon, and hot glue

I filled it with different chocolates and gave it to my Grandma for her birthday.  


Sorry for such a long post.  Feel free to email me with any questions about my project.

Hope you enjoy!