Wednesday, December 28, 2011

100 Follower Giveaway!!!!!

*****Giveaway is now over check back on Friday to see if your a winner!*****

Yeah!!! I made it to 100 followers! Thank you to all my followers!!!!
Time for a giveaway... well actually 2.

First I will be giving away a Brand New Cricut Lite Cartridge.
Savory


and the second giveaway is a Close To My Heart Stamp set.
I think it is called Pair A Phrase, it was a limited edition with purchase stamp set.


So all you need to do to enter is be a follower of my blog and leave a comment.

And for an extra entry like my Facebook page and come back and leave another comment letting me know that you did. (link is also on the left) MAKE SURE YOU POST A SEPARATE COMMENT BELOW FOR LIKING ME ON FACEBOOK SO IT COUNTS FOR YOUR SECOND ENTRY. :)

You have until 10 pm CST. on Jan. 4 to enter.

Good Luck Everyone!

****UPDATE****

If I reach 150 followers by tonight deadline to enter I will pick one more winner to win a 10 yd sample of new Valentine Cherry Cupcake by Trendy Twine!


Saturday, December 24, 2011

New Design Team and A Giveaway!

I have some very exciting news!!!! Trendy Twine has asked me to be on their Design Team and of course I accepted!


If you've never used their twine I would definitely try them out. My collection isn't complete(yet..) but all the colors I have so far are awesome and it's so easy to use. You can click here to see all the projects I have done so far with their twine. I'm so excited about joining the team and creating more new projects with their fantastic twine! And while I'm talking about twine... you can win a full spool of their twine by becoming a follower of their blog here and leaving a comment.


Two lucky winners will have their choice of either Berry Red or Holly Green! So make sure you head over to Trendy Twine and if you want you can let them know I sent you. You have until Dec. 28th at 11:00 pm CST to enter.

Thanks for stopping by!


Friday, December 23, 2011

Snowman Soup


Welcome to Erica's Craft Room
25 Days of Christmas,
with 25 Cricut projects a day.
Don't forget to stop by Erica's blog to see 24 more projects today....
and every day in December.


Today's theme is Snowmen. This is my last post as a seasonal design team member and I just wanted to say how much I've enjoyed creating all month long for this team. Now onto my project.


I cut the snowman from Gypsy Wanderings at 3" and the coffee cup is also cut at 3". I cut the steam off of the cup and cut the bottom of the snowman off. The silver behind the snowman was cut with a Spellbinder's die and it's sticker paper(which I had no idea it was until after I cut it, lol).


The stamp is from Jaded Blossom's set Snowman Kisses. I cut the label from Elegant Edges(2.5" and 2.75"), and the twine is Trendy Twine's Holly Berry.


I filled the bucket with Hot Cocoa, Marshmallows and Candy Canes.

Recipe-

Cricut Cartridges- Gypsy Wanderings, Elegant Edges and Love You A Latte

Paper- DCWV, Core'dinations, Paper Studio and white card stock.

Stamps- Peachy Keen (Snowmany Faces Asst.), Jaded Blossom (Snowman Kisses)

Twine- Trendy Twine(Holly Berry)

Other- Gel Pens, Chalk, Memento Black and green ink, Tim Holtz holiday distress inks

Thanks for looking!


Thursday, December 22, 2011

Easy Christmas Tags

Just wanted to do a quick post on these Christmas tags I made last night.


I used Jolly Holidays for the tags and cut them at 1.25".


All of the face stamps are Peachy Keen and the snowflakes and to/from are Jaded Blossom.


Recipe-

Cricut Cartridge- Jolly Holidays

Paper- DCWV and Core'dinations 

Stamps- Peachy Keen(Snowmany Faces asst. and Snow Cuties asst.) Jaded Blossom ( Snowman Kisses)

Twine- Trendy Twine(Peppermint Stick and Twisted Lime)

Other- Tim Holtz distress holiday inks, Memento Black ink, Chalk and gel pens.

Thanks for looking!

Snowflake Skittle Sticks

I finally made my first Skittle sticks and I love how cute they turned out!


How cute are these faces! I used Peachy Keen "The Cornies asst".  I found bags of Holiday Skittles so I didn't have to pick through a bag to get all the red and green ones.

Recipe-

Cricut Cartridge- Winter Lace(2" snowflake shadow)

Paper- Core' dinations(white gemstones)

Stamps- Peachy Keen(The Cornies Asst.)

Twine- Trendy Twine(Candy Cane)

Other- Memento black ink, chalk, silver marker

Thanks for looking!

I'm only 2 followers away from 100! Yeah! I'll be doing a giveaway once I reach it.


Tuesday, December 20, 2011

Magical Reindeer Food

I finally got to use my new Jaded Blossom stamps and made some Magical Reindeer Food. I think they turned out so cute!


I used Lacy Labels and Doodlecharms.


Here's a closeup of the reindeer and poem. Love how easy it is to make tags with these stamps!


Reindeer Food- oatmeal, red and green sprinkles or candy sugar and some white glitter.

Recipe-

Cricut Cartridges- Doodlecharms(reindeer 1.5") Lacy Labels(white 3.5w x 1.25h, green 3.75w x 1.5h)

Paper- white and brown card stock, Core'dinations(tan), Paper Studio(red glitter) and DCWV(green)

Stamps- Jaded Blossom(Reindeer Magic) and Peachy Keen(Wide Eyed and Bushy Tailed Asst.)

Twine- Trendy Twine(Candy Cane)

Other- Memento ink(black, brown and red), Tim Holtz Red Winter ink, white gel pen

Thanks for looking!

Monday, December 19, 2011

TGF 3rd Annual Customer Blog Hop

If your looking for Erica's Craft Room's 25 Days of Christmas page down or click here.


Welcome to the TGF Blog Hop, you can click the picture above to return to TGF for the list of blogs to visit.  TGF will be giving away a total of 3 Grand Prizes!  Two of them will go to participants in the blog and the third will go to a random hopper. The Grand Prize is the Entire upcoming January Release! The only way to win is to participate so make sure you hop along to every one's blog, here is the link again to find the list.

I'm participating in both project contests. 
Here's my holiday project-


I used the Xmas sweetie set and Holiday Anya for my tags.

Here's my General project


I made my friend card with Beanie Anya

Recipe- 

Cricut Cartridge- Art Philosophy(tags)

Paper- DCWV, Recollections, white card stock

Stamps- The Greeting Farm(Xmas Sweetie, Holiday Anya, Beanie Anya), Pink By Design(Friends To The 
End, Winter Fun)

Twine- Twinery(Caribbean), Trendy Twine( Peppermint, Candy Cane)

Other- Copics, Puffy Velvet Markers, Stickles, Epiphany Shape Tool, Spellbinders, Memento Ink

Don't forget to visit all the other blogs for you chance to win the Grand Prize.

Thanks for looking!


Hot Cocoa Gift Card Holder


Welcome to Erica's Craft Room
25 Days of Christmas,
with 25 Cricut projects a day.
Don't forget to stop by Erica's blog to see 24 more projects today....
and every day in December.

Today's theme is Hot Cocoa/Coffee/Tea. Here is the Gift Card Holder I made.


I used Love You A Latte for the cup of cocoa(at 3.5").  I used a Puffy Velvet marker for the whipped cream to make it look more real and red and green Stickles for the sprinkles.


The card was cut from Cindy Loo at 6.5" height.

Recipe- 

Cricut Cartridges- Cindy Loo and Love You A Latte

Paper- DCWV(plaid and green pattern), Paper Studio(green glitter, textured brown), Recollections(gold)

Stamps- Pink By Design(Winter Fun, Old Time Christmas)

Other- Momento Dye Ink(red,black,brown), ribbon(target $1 bin), Scallop punch, Stickles(red and green)

Thanks for looking! 


Sunday, December 18, 2011

Elf Gift Container


Welcome to Erica's Craft Room
25 Days of Christmas,
with 25 Cricut projects a day.
Don't forget to stop by Erica's blog to see 24 more projects today....
and every day in December.

Today's theme is Elves, here's the gift container I made.


The container I used is a desk organizer you can put your own pictures in. The elves are cut from Jolly Holidays at 2.5".


I used Stickles on all the white parts on the girl elf.


The tree is cut from Create a Critter at 2.24 or 3.25 Real Dial size. The snowflakes were punched out of glitter paper for the background. I used Trendy Twine for the garland on the tree and gold Stickles for the star.

Recipe-

Cricut Cartridges- Jolly Holidays and Create a Critter

Paper- My Minds Eye 6x6 paper stack,  Paper Studio(glitter paper), scrap paper

Stamps- Pink by Design(Winter Fun), Peachy Keen(Snowmany Faces asst.)

Twine- Trendy Twine(Peppermint Stick)

Other- Stickles, Chalk, Memento black ink, Fiskars snowflake punch, White gel pen

Thanks for looking!


Friday, December 16, 2011

Christmas Treat Holders


Welcome to Erica's Craft Room
25 Days of Christmas,
with 25 Cricut projects a day.
Don't forget to stop by Erica's blog to see 24 more projects today....
and every day in December.

Today's theme is Candy. Here are my two projects.


A candy cane box and a Hershey Nugget holder.


Here what the box looks like opened. The candy is cut from Sweet Shop at 1.25" and the box is from Art Philosophy cut at 11.5".


I wrapped mini candy canes in silver tulle and tied it closed with some twine.


And here's the finished product. I used the plastic that my cartridges came it for the candy wrapper and sanded it, then glued the candy piece to the plastic with glossy accents. The tag is made with Goodie Labels from Pink By Design.


For my second treat holder I used my Gypsy and welded a rectangle(2.5"x5") to the gingerbread man(3.25") to make this shape above. I then scored it at 2" and 3 3/8". If you don't have a gypsy you could always just glue the gingerbread man to the front.


Here's my little man before the gel pen stitching and rosy cheeks. I used a face from Peachy Keen  Snowmany Faces asst.


I used the Pink by Design stamp and die set It's a Wrap to cover the chocolate nuggets.


And here's the finished holder, I attached him with 3d foam dots so he sticks out a little.


Here you can see how the candy fits in there. You can fit 2 candy bars into this. I used a 3m glue dot that is re-potion-able to close it, but I think I might change it to a regular glue dot because it keeps popping open.


Here they are done again.

Recipe Green Box-

Cricut Cartridges- Art Philosophy and Sweet Shop

Paper- DCWV(Mrs. Claus's Kitchen) Paper Studio( glitter paper), and Core'dinations(white pearl) Clear Plastic

Stamps- Pink By Design(Goodie Labels)

Twine- Trendy Twine(Christmas Candy Cane)

Other- Red Stickles, Memento Ladybug Ink, Glossy Accents, Silver Tulle

Recipe Gingerbread Treat Holder-

Cricut Cartridges- Jolly Holidays and Gypsy Wanderings

Paper- DCWV(Mrs. Claus's Kitchen), Paper Studio(glitter paper), Core'dinations(opal pearl, burnt sugar)

Stamps- Pink By Design(It's a Wrap stamp and die set) Peachy Keen(Snowmany Faces asst.)

Other- Memento ladybug and Rich Cocoa ink, white gel pen, chalk, 3d foam dots

Thanks for looking!


Thursday, December 15, 2011

Rosette Christmas Trees


Welcome to Erica's Craft Room
25 Days of Christmas,
with 25 Cricut projects a day.
Don't forget to stop by Erica's blog to see 24 more projects today....
and every day in December.

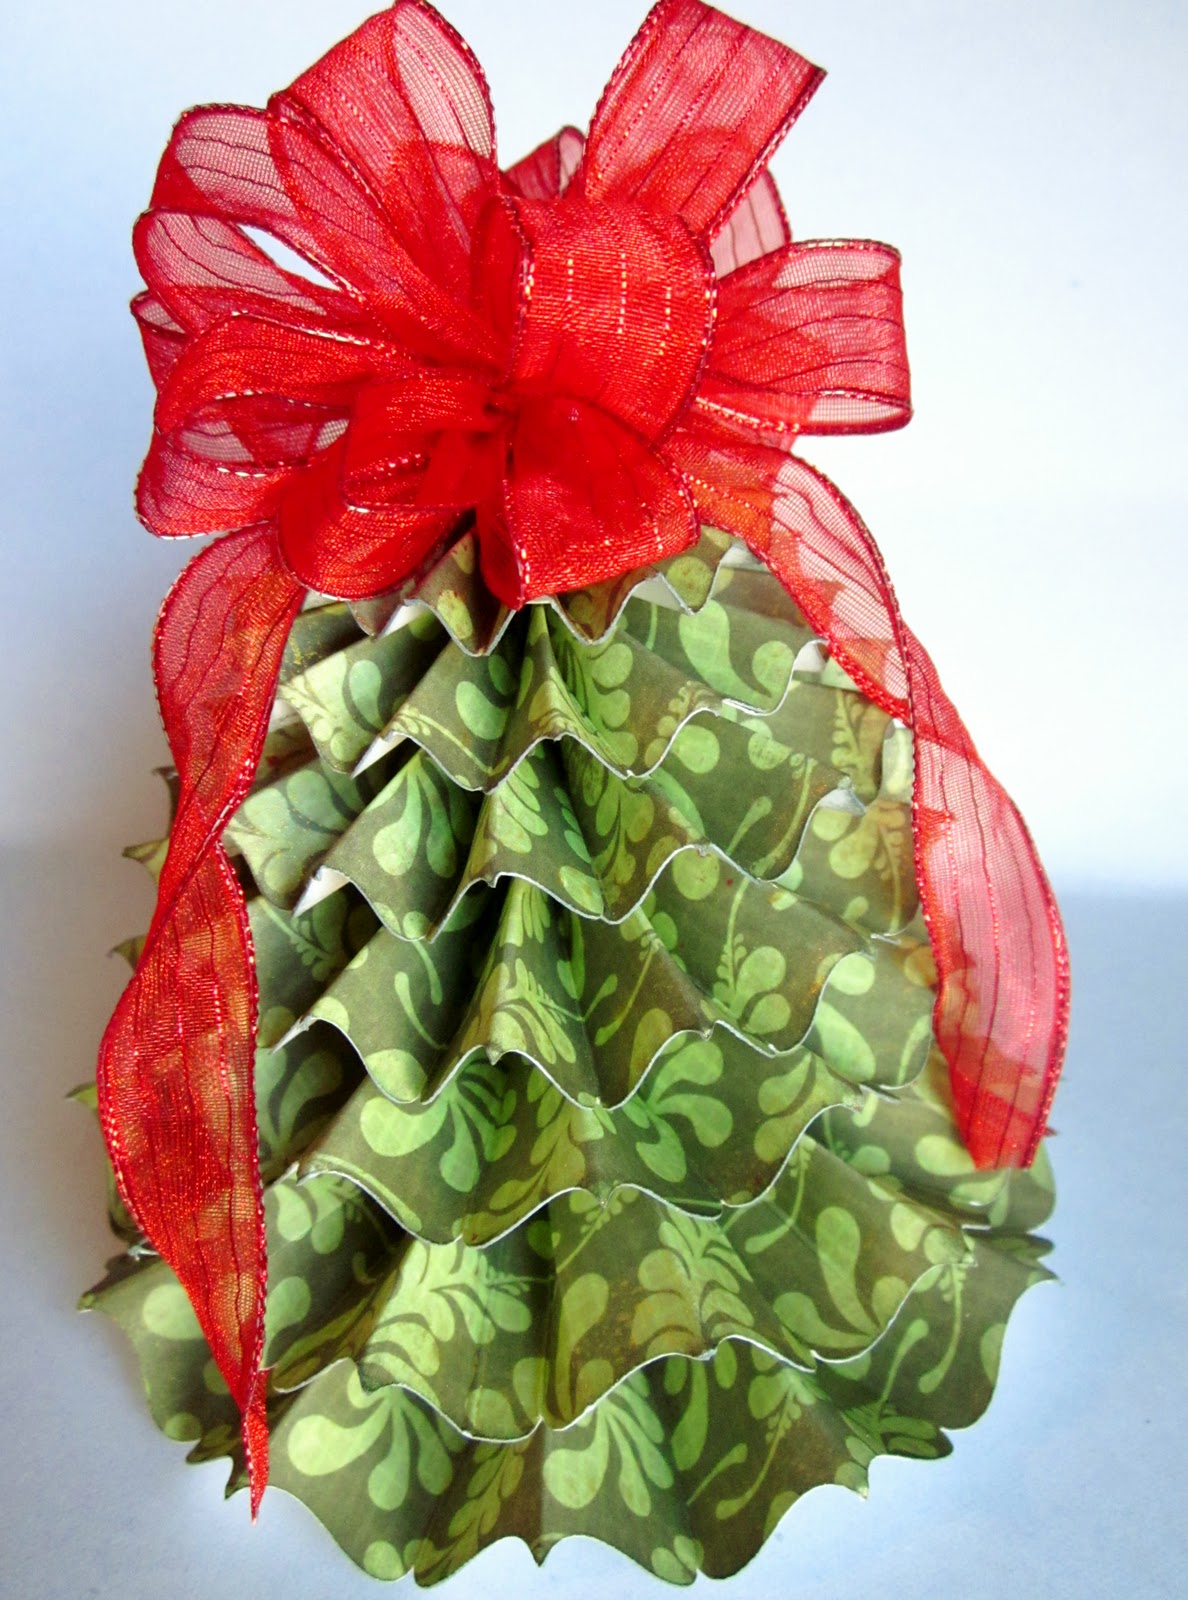
The theme today was trees, here is what I made.


I used Ribbons and Rosettes to make this tree. It was my first time making a rosette with this cartridge. I used my gypsy to weld the pieces together so I didn't have to glue them all.


This is what they look like unwelded, depending on the size you will probably need 3-4 of these for 1 rosette.
I used the Bracket1 cut on page 26.


These are the ones that I welded, so much easier. I will list all the sizes and how many I welded together in the recipe below.


If you weld them together the score marks disappear which was fine with me, I just used my MS scoreboard to score them. You just score along each peak and dip on the strip. Then you accordion fold them and glue them in a circle. Even for the ones I welded I still had to glue more then one strip together, except for the really small sizes. I used red tacky tape to glue together.


Then you punch out 1" circles and hot glue to the back of the rosette after you flatten it.


Hot glue each layer together by putting the glue in the center of the rosette. I spray mine with some gold shimmer spray after it was put together.


Then I made a bow with some wired ribbon and hot glued it to the top. I used glue dots on the ends of the long ribbon pieces so they would stay against the tree.


Here's the finished product again. I was going to leave it plan but then found these sparkly pompoms and thought they would be cute on the tree I stuck them on with glue dots.

Recipe

Cricut Cartridge- Ribbons and Rosettes (p.26 Bracket1) 
Sizes- 2.5",2.25" and 2" weld 4 together 2 times(so 2 strips)or 8 single
1.75" weld 3 together and weld 2 together or 5 single
1.5" and 1.25" weld 4 together and 1 single, or 5 single 
1" weld 5 together or 5 single.

Paper- Recollections ( O Christmas Tree Stack) White card stock or any scrap for the 1" circles

Other- Pssst! Sheer Shimmer Spray Gold, Red Ribbon, white and red sparkly pompoms, hot glue, glue dots

Feel free to message me with any questions or ask me questions on my Facebook page there's a link to it on the right.

Thanks for looking!


Tuesday, December 13, 2011

Christmas Easel Card

I made this card for The Greeting Farm design team open call and since I didn't make the team, I thought I would post it. I love how this card turn out!


I knit the scarves on both of these cute characters.

Recipe-

Stamps- The Greeting Farm( I Heart Sweaters)

Paper- Core'dinations( grey pearl 6'x12' and 6"x6") Teresa Collins Christmas Home (Snowflakes 2 at 5.75"x5.75") The Paper Studio Red Glitter Paper

Twine- The Twinery(CharcoalMaraschino)

Other- Copics, Chalk, Red Chalk Ink, Snowflakes(Dress It Up embellishments), EK Success border punch, button, glue dots, 3d glue dots, Spellbinders Die

Thanks for looking!

I'm getting close to 100 followers!!! I'll be doing a giveaway as soon as I get there!


Monday, December 12, 2011

Snowman Christmas Card


Welcome to Erica's Craft Room
25 Days of Christmas,
with 25 Cricut projects a day.
Don't forget to stop by Erica's blog to see 24 more projects today....
and every day in December.

I made a card with embossing powder for today's theme of Snow.


I embossed the snowflakes from the Pink By Design Falling Snow Background stamp with silver powder for the front of my card. I'm not the greatest with embossing powder but I think it turned out ok. And can you believe I used 4 different Carts for this card! I listed them all below.


I made the inside pretty simple with twine and a snowflake from Winter Lace. The 2 plaid pieces of paper are cut at 4.25" x 5.25".

Recipe-

Cricut Cartridges- Lacy Labels(Asian cut at 11"H x 5.5" W real dial size) Ribbons and Rosettes(tree border 1x6 both layers) Winter Frolic(Snowman2-3") Winter Lace(2.5" for both snowflakes-row4 button 5 and row2 button 2 from the left)

Stamps- Pink By Design(Falling Snow Background Stamp and Snowflakes(2 sentiments)
Peachy Keen- PK- 544 Snow Small Faces

Paper- K&Company Christmas paper stack(plaid inside card and on snowman and trees) Core'dination(pearl for snowman and snowflakes) Paper for card base was from my stash

Other- Silver embossing powder, twine(etsy), Memento black ink, blue chalk ink, Copics and chalk.

Thanks for looking!